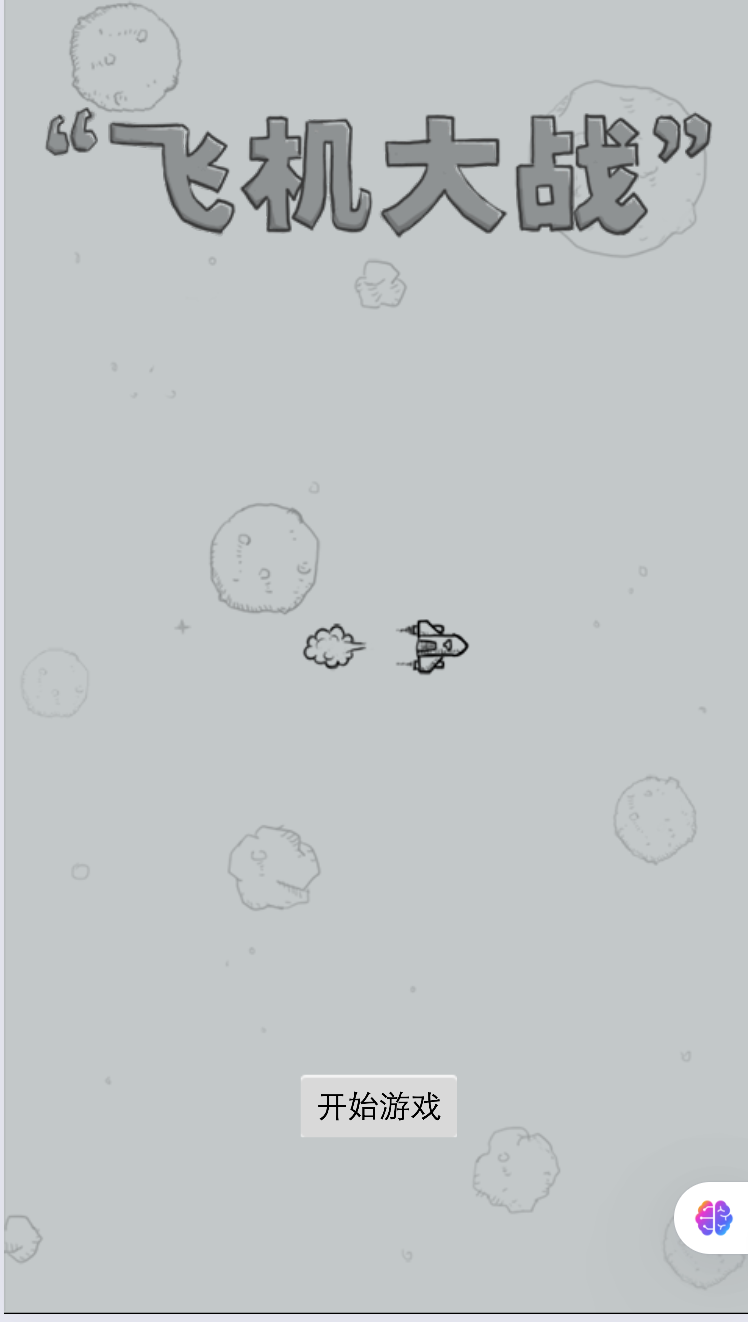
最近接入了第三方做的小游戏“你说我猜”,本身是通过cocos Creator来写的,就顺便了解了一下,照着教程写一个飞机大战熟悉cocos的一些操作,做一些技术上的储备。

主要操作玩法,触摸移动飞机,有三条命,每次碰撞都会减少生命值,红色道具是炸弹,左下角有当前有几个的数量,双击屏幕可以使用炸弹清屏,蓝色道具是双倍子弹,5秒使用时间。飞机有三种,小,中,大。左上角是分数以及暂停按钮,游戏有各种音效等。

cocosCreator是一个游戏开发编辑器,脚本语言是TypeScript,上面的飞机大战功能直接使用H5也能实现,但是会比较麻烦,比如碰撞判断,场景切换等,这些在cocos的编辑器都做了封装,只需要通过配置的方式以及少量的代码就可以比较方便的实现各个功能,还可以发布到微信小游戏,支付宝小游戏等等等平台,都做了兼容适配,当然对于前端来讲,也有一定的学习成本,主要是编辑的使用,以及cocos的代码逻辑组织方式,和使用Vue/React等完全不同。

关于cocos的使用,官方文档都有比价全的介绍了,国产软件,可以直接看cocos官网文档来学习,cocos一般比较适合做小游戏,如果是中大型就要用unity或者虚幻引擎等了。

这里分享只分享大概内容,具体可以结合代码查看

首先是cocos界面的配置,官网下载好以后,注册账号,右上角选择创建项目

一些基本概念

预制体prefab

从层级管理器拖拽到资源管理器,就可以生成一个prefab,prefab更像是一个制作好的组件,里面包含了完成的各个功能,可以直接拿来使用以及组装。
比如这里的enemy就是做成了prefab

节点

层级管理器中的每一个都是一个节点

场景

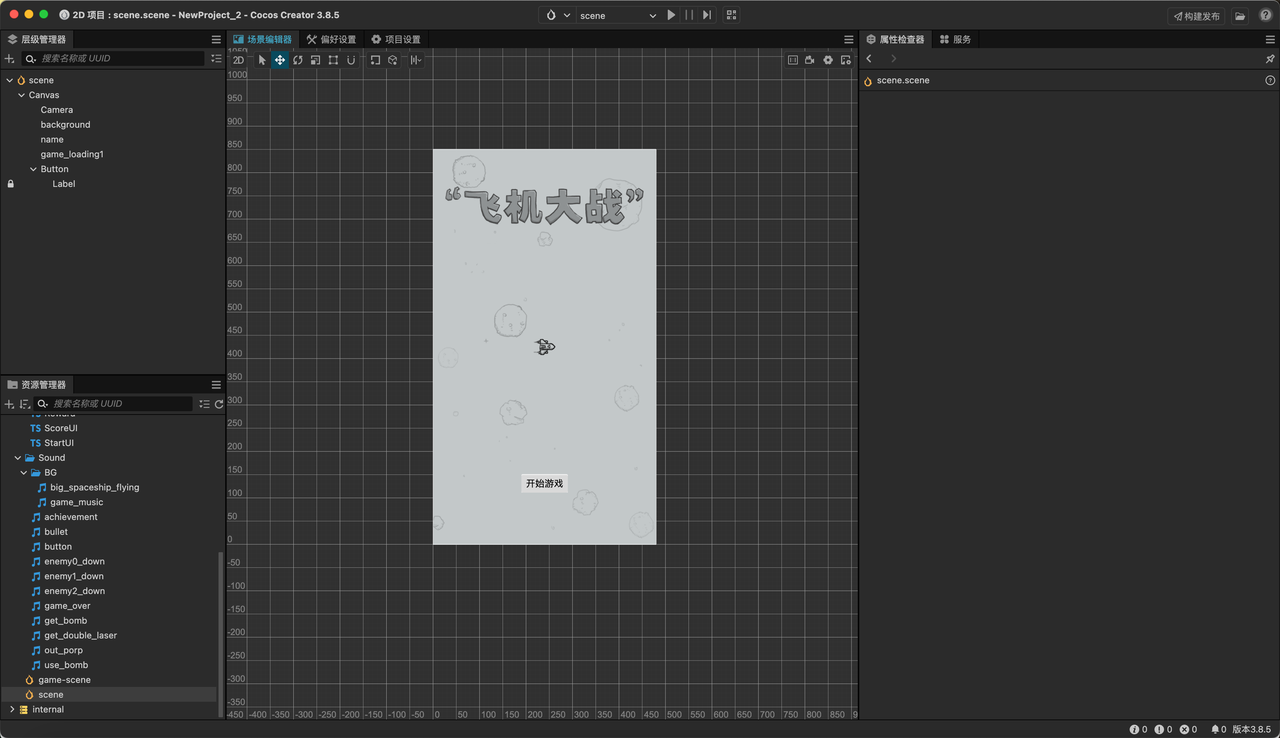
游戏中的每一个场景界面,对应游戏中的是scene文件,比如游戏开始界面的scene,游戏开始后的scene等

编辑器基本界面配置

https://docs.cocos.com/creator/3.8/manual/zh/editor/ 官网文档介绍

  • 层级管理器:类似图层,页面上的元素,每一个都是一个节点,都会放在这个位置
  • 资源管理器:管理游戏中的脚本代码,图片,场景,prefab等,声音动画等都放在这个位置
  • 场景编辑器:制作游戏场景视图区域,通过拖拽,节点属性绑定的展示在页面中
  • 属性检查器:选中的节点中的属性都可以在这里编辑,或者挂载其他组件

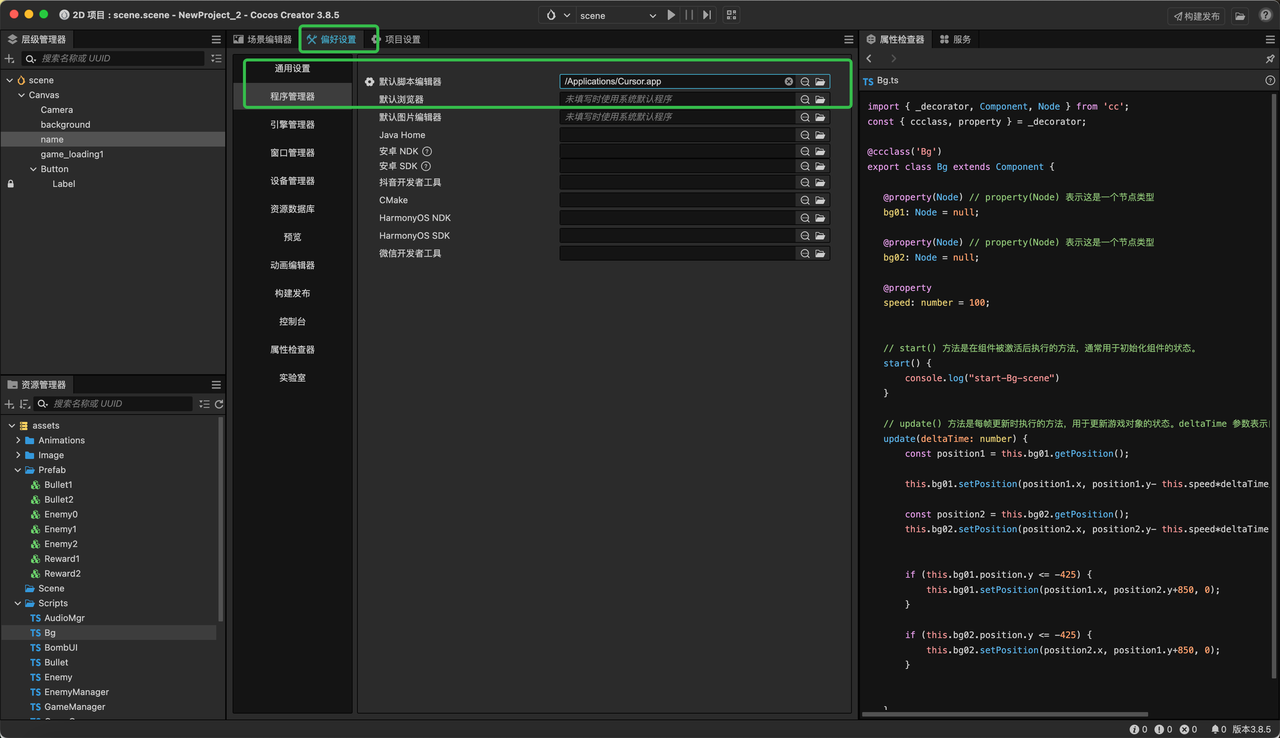
在资源管理器中右键可以创建脚本,双击打开编辑器,默认编辑器是vscode,当然可以自己修改为cursor等

主角移动

这里实现主角移动以及背景滚动效果和H5类似,也是写逻辑和触发touchmove事件
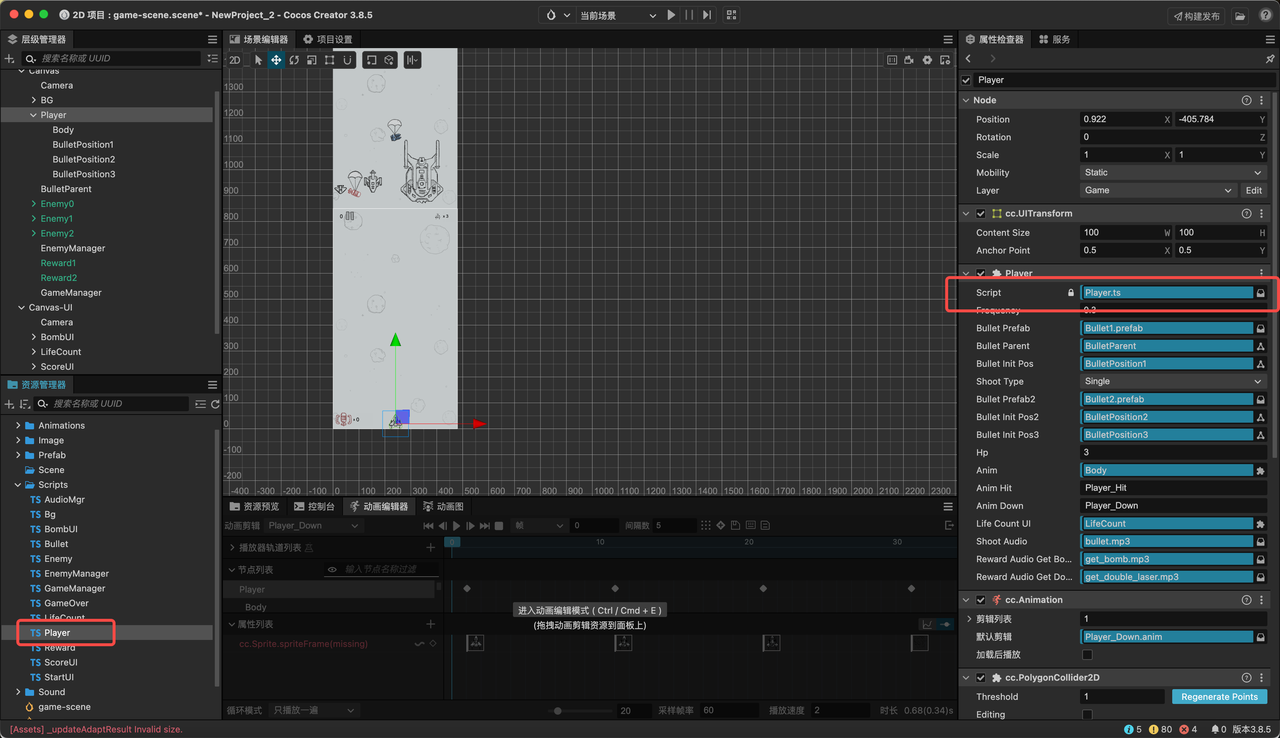
创建Player.ts文件,和节点绑定,将脚本文件拖拽过去就行

背景移动

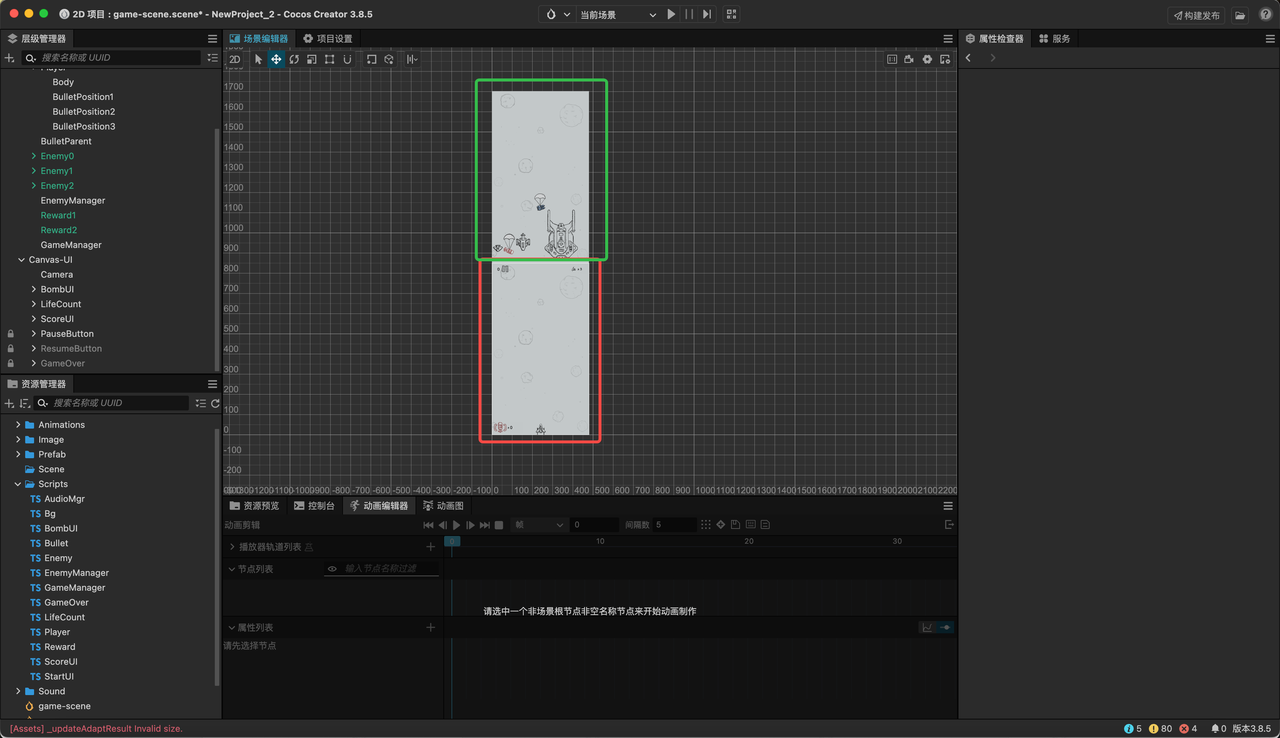
逻辑和H5一样,其实背景是两个,轮流滚动,看起来就行主角飞机在飞一样
红色是游戏区域,绿色是无缝轮播图的第二张图片

代码实现方式是在update函数(这是cocos提供的,每一帧更新都会执行。类似前端的RAF函数),在这个函数中会有一个两帧间隔时间做一些计算就可以实现了。

1
2
3
4
5
6
7
8
9
10
11
12
13
14
15
16
17
18
19
20
21
22
23
24
25
26
27
28
29
30
31
32
33
34
35
36
37
38
39
40
41
42
43
import { _decorator, Component, Node } from 'cc';
const { ccclass, property } = _decorator;

@ccclass('Bg')
export class Bg extends Component {

@property(Node) // property(Node) 表示这是一个节点类型
bg01: Node = null;

@property(Node) // property(Node) 表示这是一个节点类型
bg02: Node = null;

@property
speed: number = 100;


// start() 方法是在组件被激活后执行的方法,通常用于初始化组件的状态。
start() {
console.log("start-Bg-scene")
}

// update() 方法是每帧更新时执行的方法,用于更新游戏对象的状态。deltaTime 参数表示自上一帧以来经过的时间(以秒为单位)。
update(deltaTime: number) {
const position1 = this.bg01.getPosition();

this.bg01.setPosition(position1.x, position1.y- this.speed*deltaTime/** 速度*时间 */, position1.z );

const position2 = this.bg02.getPosition();
this.bg02.setPosition(position2.x, position2.y- this.speed*deltaTime, position2.z );


if (this.bg01.position.y <= -425) {
this.bg01.setPosition(position1.x, position2.y+850, 0);
}

if (this.bg02.position.y <= -425) {
this.bg02.setPosition(position2.x, position1.y+850, 0);
}


}
}

场景切换

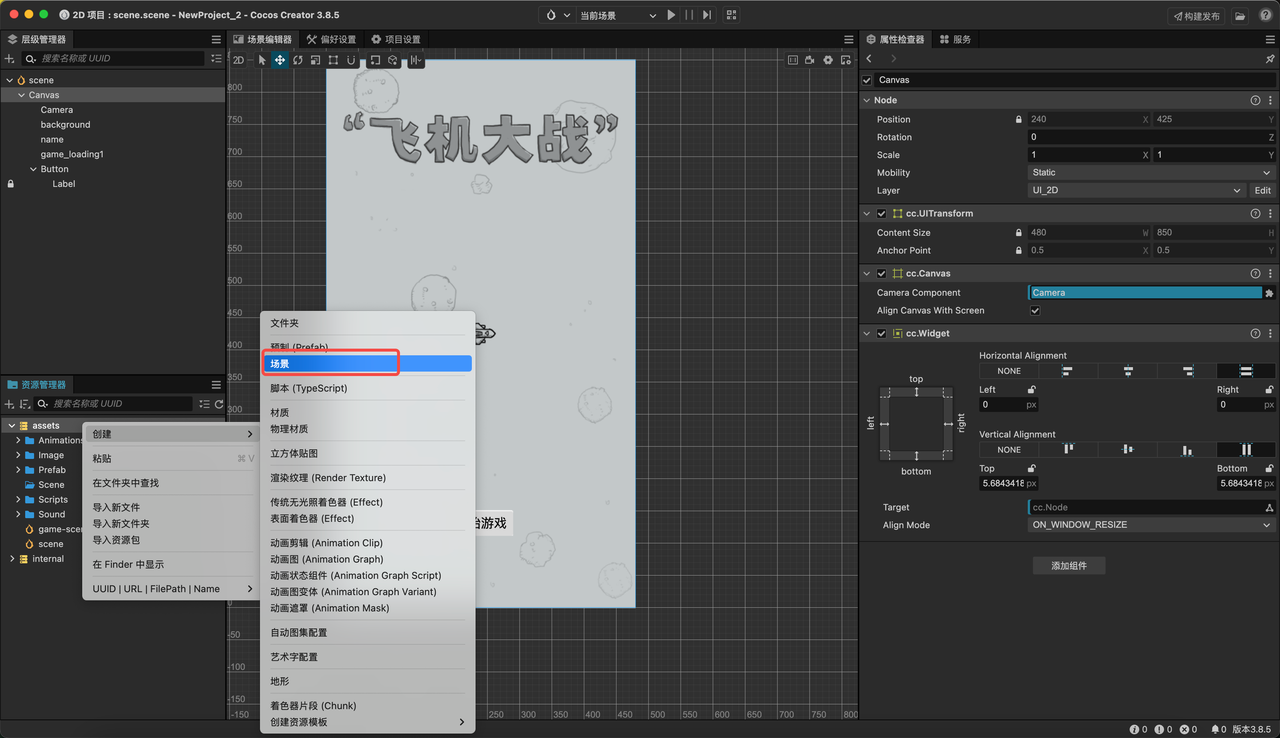
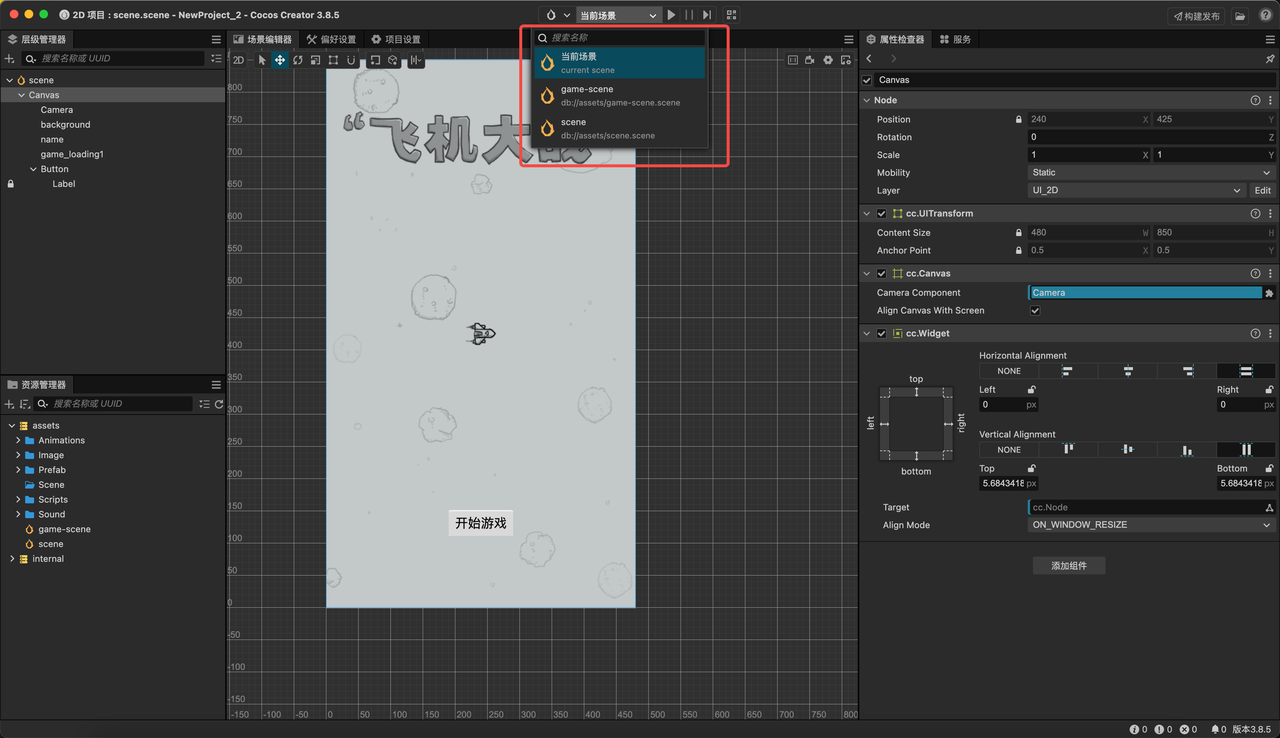
游戏中场景切换比较常见,从一个场景切换到另外一个场景。场景可以在资源管理器中创建,顶部可以选择到对应的场景进行编辑

场景切换代码可以通过director.loadScene来实现

1
2
3
4
5
6
7
8
9
10
11
import { _decorator, Component, director, Node } from 'cc';
const { ccclass, property } = _decorator;

@ccclass('StartUI')
export class StartUI extends Component {
onStartButtonClick() {
console.log('onStartButtonClick');
director.loadScene('game-scene');
}
}

动画制作

https://docs.cocos.com/creator/3.8/manual/zh/animation/ 官网文档介绍
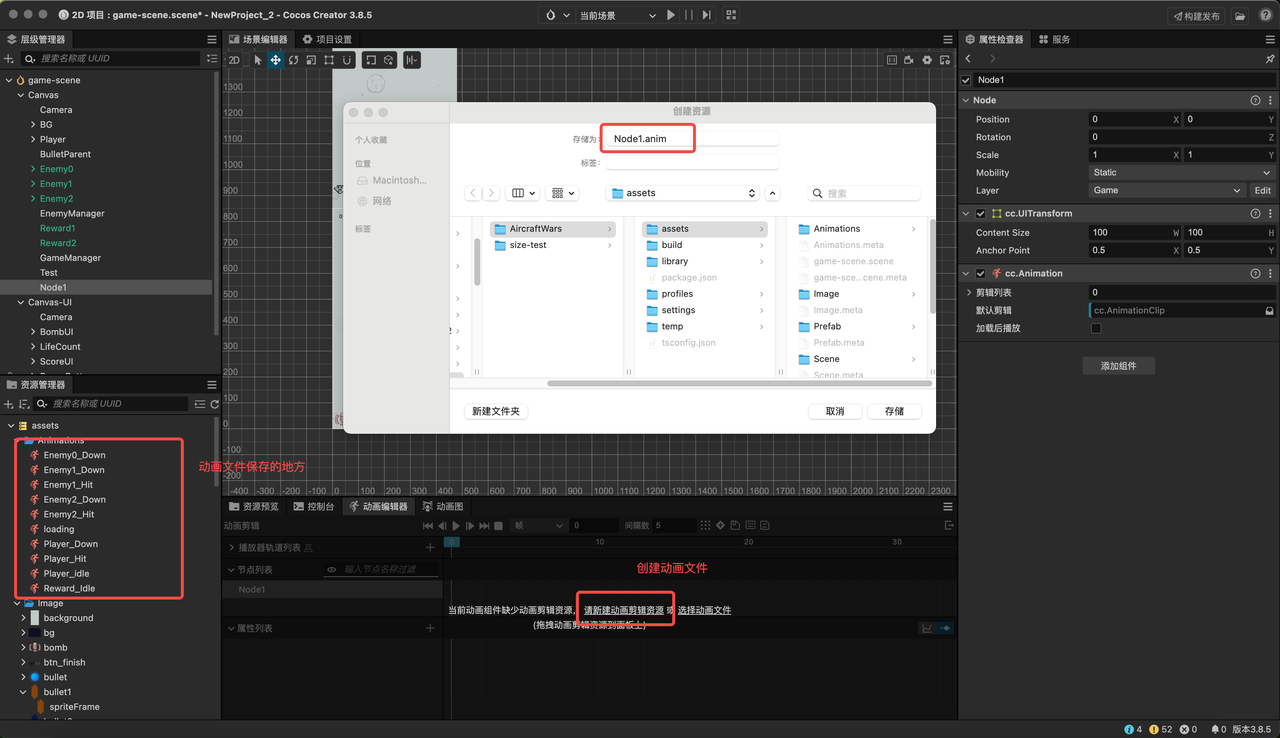
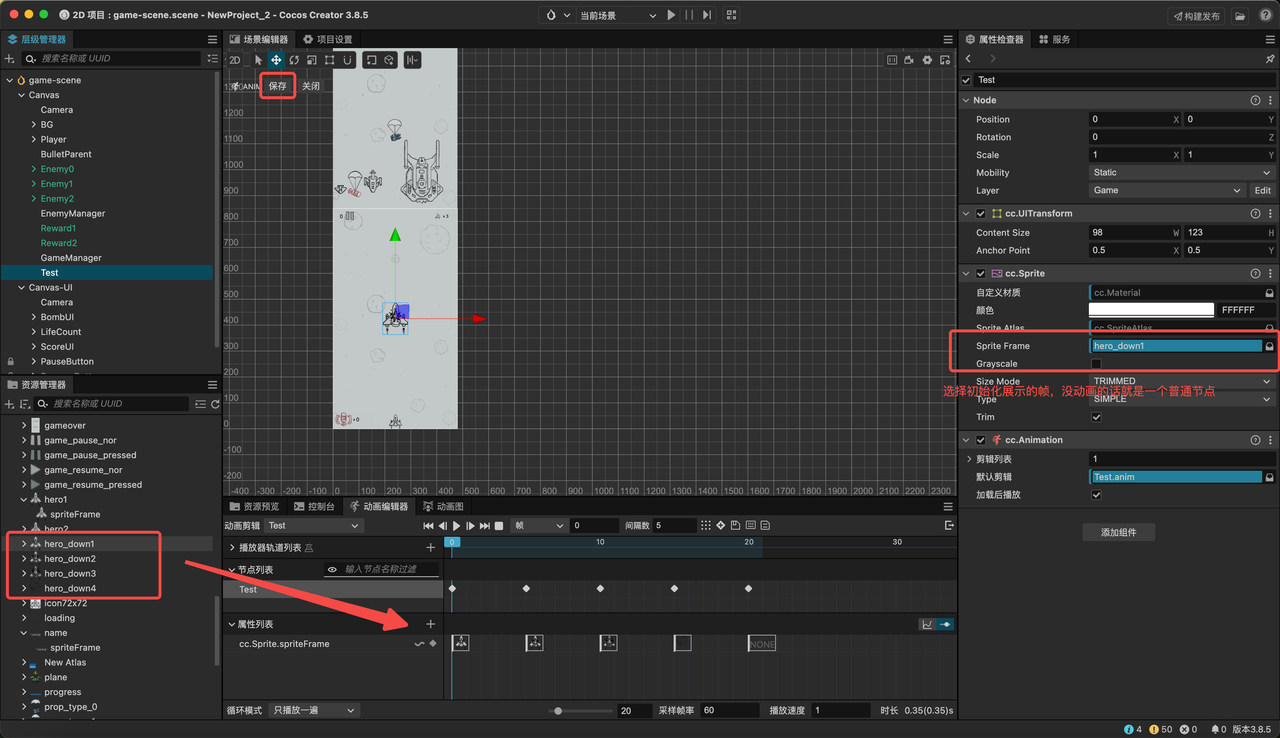
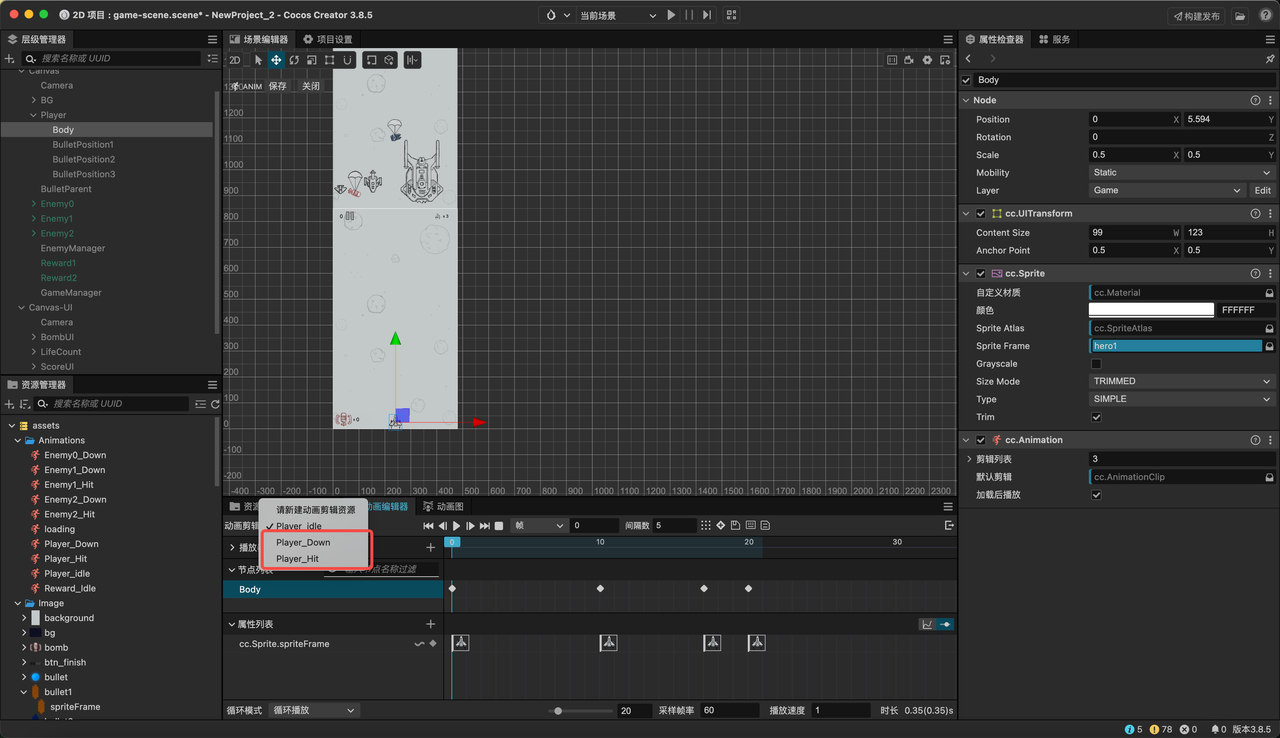
比较常见的是帧动画,在飞机大战中都是通过帧动画来实现的。先选中节点-创建添加动画组件-保存动画文件-编辑动画-保存-脚本中调用播放。

  1. 创建动画文件

对节点的动画进行编辑,这里是帧动画,将左侧的每一帧都放进来

这样一个简单的帧动画就做完了。代码中如何调用到这个动画?基本思路逻辑为:

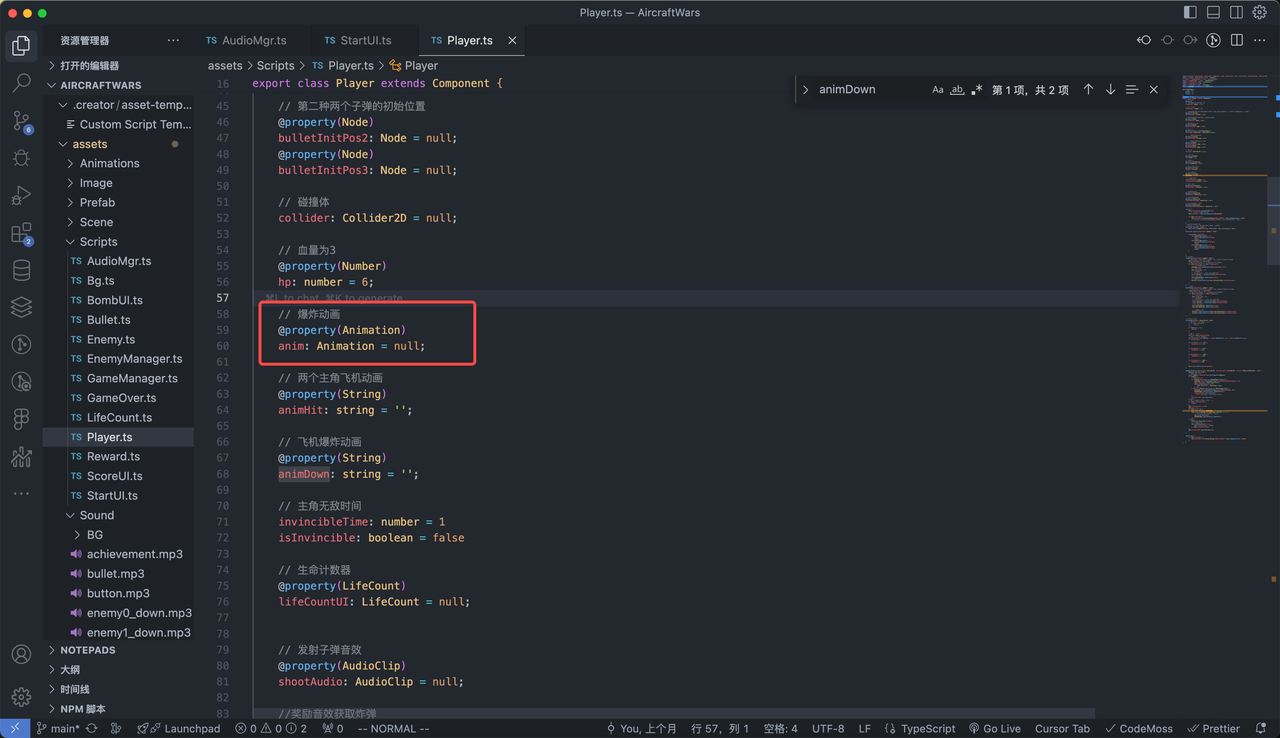
  1. 在代码中声明一个public的动画属性
  2. 此时在编辑器中是可以在右侧面板中看到这个属性的,但是没有值
  3. 输入动画文件名称到游戏编辑器这个属性中
  4. 此时游戏代码中可以直接调用play

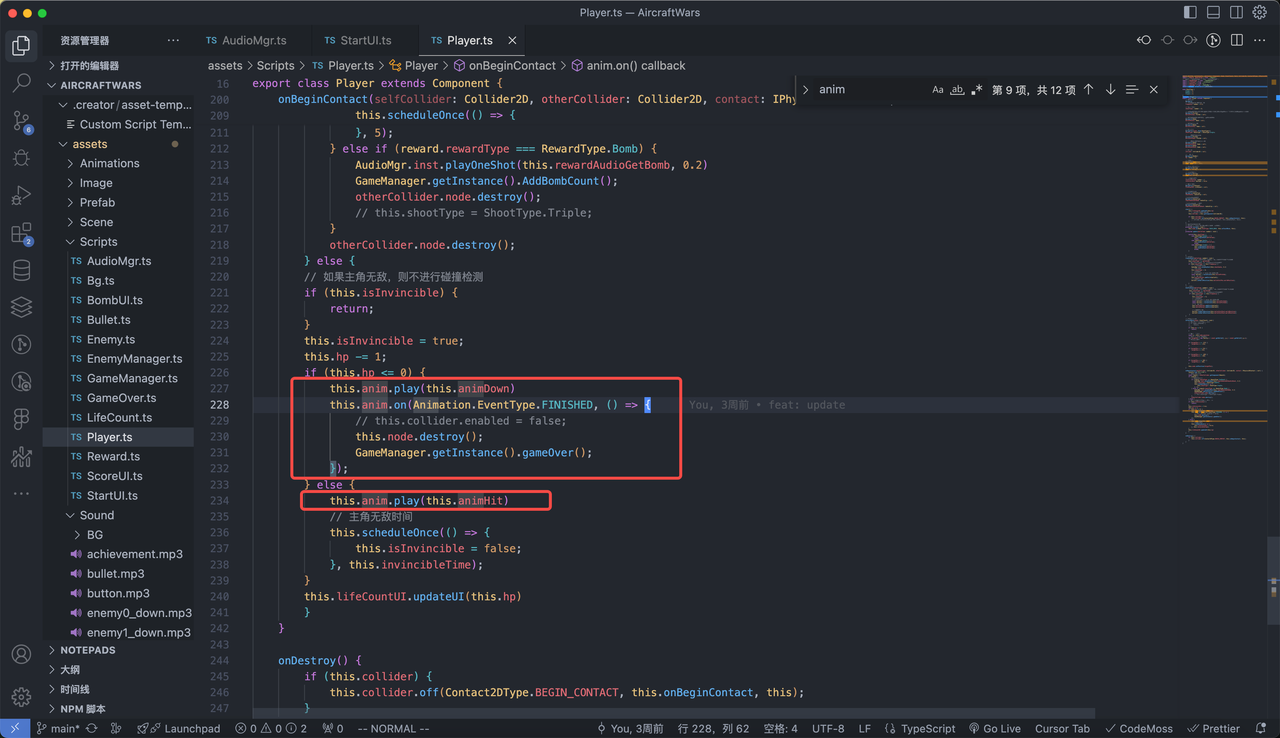
比如我们的飞机碰撞以后会爆炸的动画效果:

  1. 声明是一个属性
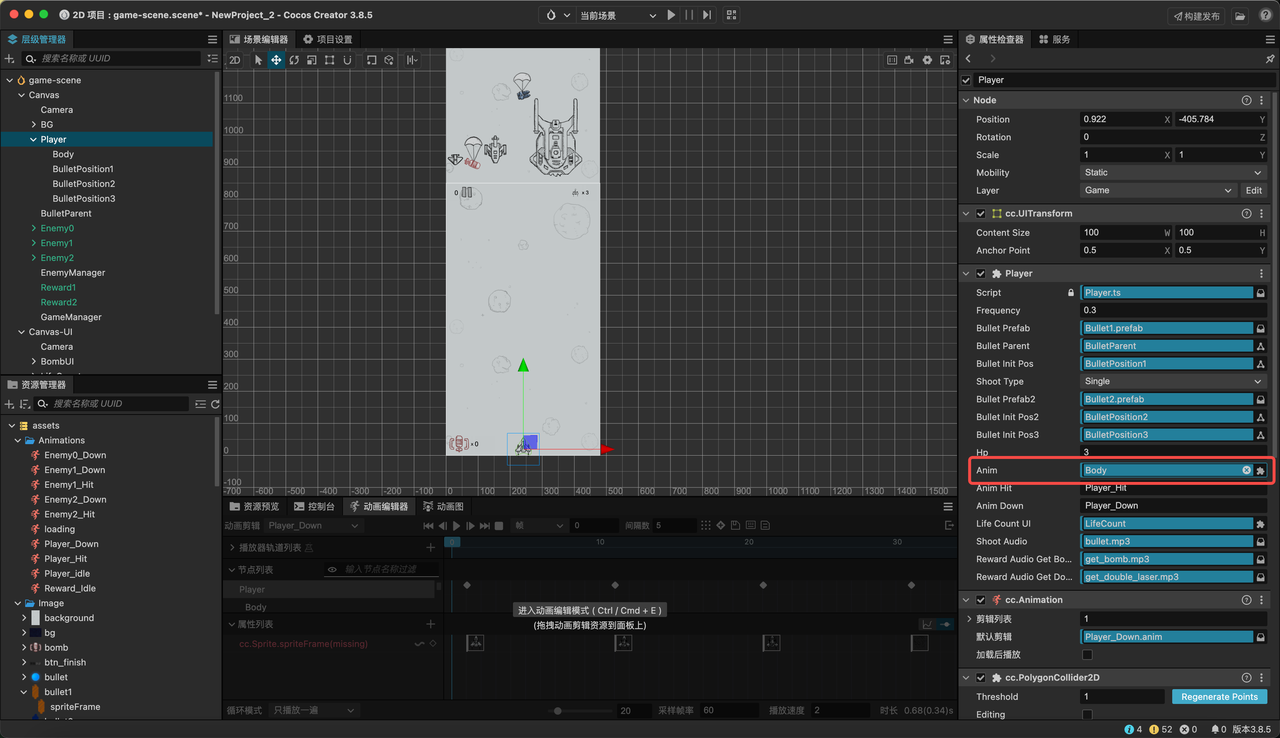
  1. 编辑器中可以看见并且设置

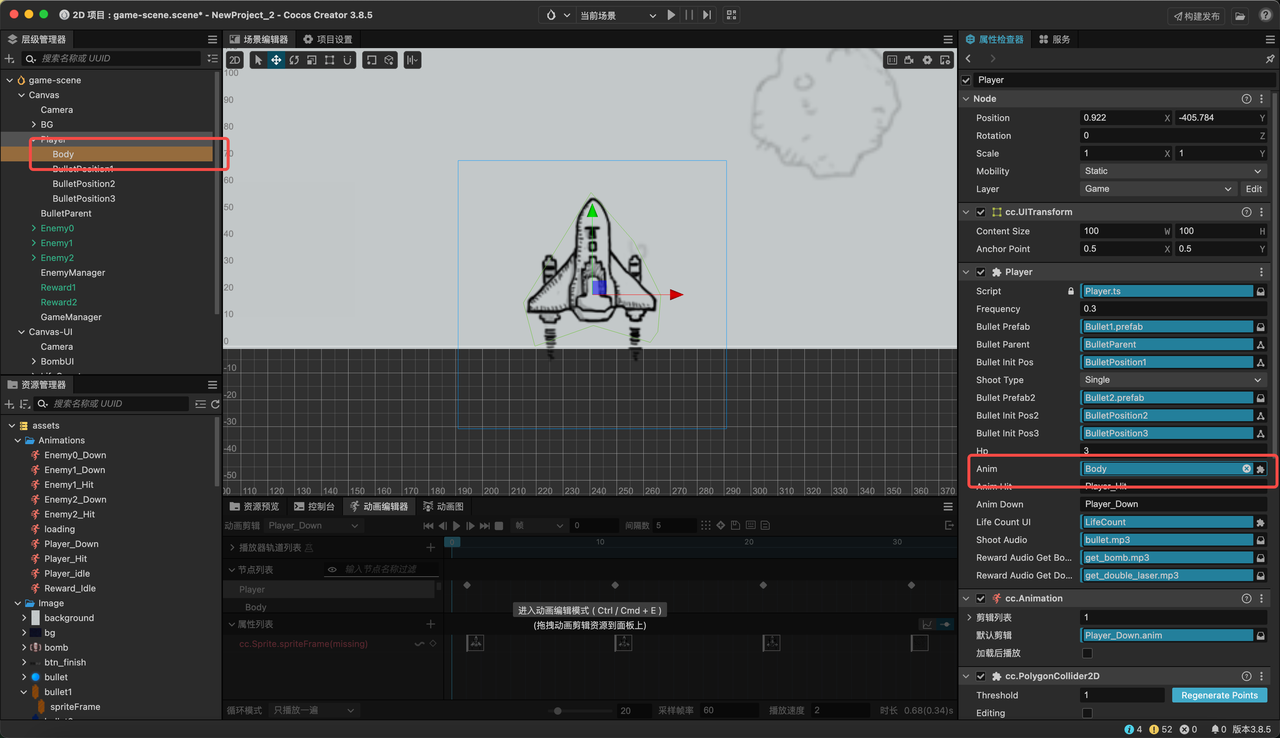
  2. 将设置好动画的body节点拖入编辑器中

(body此时是绑定了几个动画的)

  1. 代码调用

大致逻辑如上。总结下来就是给节点绑定了动画,然后就可以在编辑器中和代码做关联,然后可以直接调用控制到动画播放。

敌人飞机生成

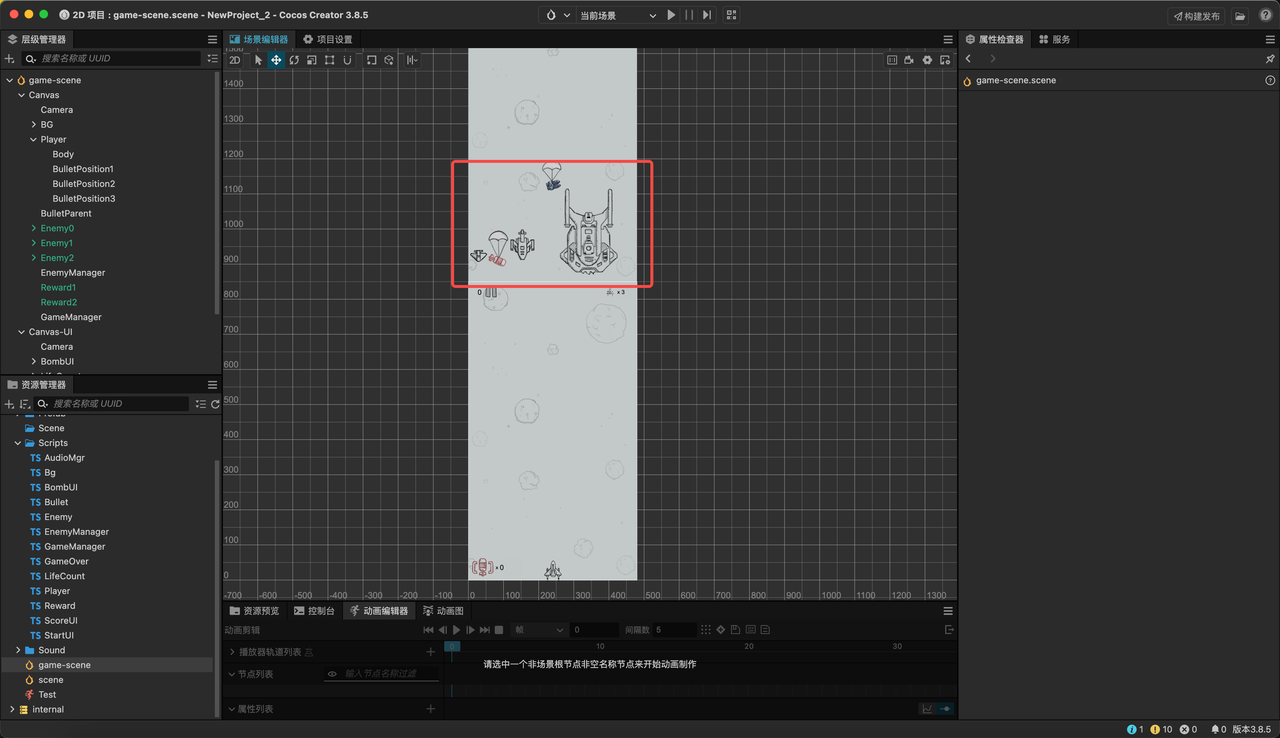
每次都会有不同的敌机生成,如何来实现?其实主要思路为,先创建敌机的节点,放到屏幕外,通过代码创建新的飞机然后更改x轴坐标执行运动

这里是已经做好的prefab敌机,放在屏幕外面,代码声明一个属性是prefab类型,就可以在游戏编辑器把敌机拖入进去,代码控制创建新的和移动
主要代码逻辑

1
2
3
4
5
6
7
8
9
10
11
12
13
14
15
16
17
18
19
20
21
22
23
24
25
26
27
28
29
30
31
32
33
34
35
36
37
38
39
40
41
42
43
44
45
46
47
48
49
50
51
52
53
54
55
56
57
58
59
60
61
62
63
64
 // 小飞机生成频率,1s一个
@property
enemy0Frequency: number = 1
// 小飞机预制体,从场景中获取。prefab类型必须有
@property(Prefab)
enemy0Prefab: Prefab = null;

// 中飞机生成频率,1s一个
@property
enemy1Frequency: number = 2
// 中飞机预制体,从场景中获取。prefab类型必须有
@property(Prefab)
enemy1Prefab: Prefab = null

// 大飞机生成频率,1s一个
@property
enemy2Frequency: number = 5
// 大飞机预制体,从场景中获取。prefab类型必须有
@property(Prefab)
enemy2Prefab: Prefab = null

//游戏开始执行的函数
start() {
console.log(this.enemyArray,'start')
// console.log(this.rewardPrefab1)
// console.log(this.rewardPrefab2)
// 每秒生成一个小飞机,schedule是定时器,最后一个参数是时间间隔,单位是秒
this.schedule(this.generateEnemy0, this.enemy0Frequency);
this.schedule(this.generateEnemy1, this.enemy1Frequency);
this.schedule(this.generateEnemy2, this.enemy2Frequency);
this.schedule(this.generateReward1, this.reward1Frequency);
this.schedule(this.generateReward2, this.reward2Frequency);
}

// 生成小飞机
generateEnemy0() {
this.generateEnemy(this.enemy0Prefab, this.enemy0Frequency, 215, 400);
}

// 生成中飞机
generateEnemy1() {
this.generateEnemy(this.enemy1Prefab, this.enemy1Frequency, 200, 450);
}

// 生成大飞机
generateEnemy2() {
this.generateEnemy(this.enemy2Prefab, this.enemy2Frequency, 150, 450);
}

// 生成逻辑抽离
generateEnemy(prefab: Prefab, frequency: number, x: number, y: number) {
if (prefab === null) {
return
}
// 实例化小飞机
const enemy = instantiate(prefab);
// 添加到场景中,也就是EnemyManager的子节点中
this.node.addChild(enemy);
const randomX = randomRangeInt(-x, x);
enemy.setPosition(randomX, y, 0);
enemy.active = true;
this.enemyArray.push(enemy)
console.log(this.enemyArray,'generateEnemy')
}

通过instantiate方法实例化prefab,通过this.node.addChild 可以添加到场景中,然后设置x轴随机一个位置。this.schedule是类似定时器,可以指定时间执行一次

敌机的位置向下移动是在Enemy.ts的update函数中写好的

1
2
3
4
5
6
7
8
9
update(deltaTime: number) {
// 敌机向下移动, 如果血量大于0
if (this.hpLabel > 0) {
this.node.setPosition(this.node.position.x, this.node.position.y - this.speed * deltaTime);
}
if (this.node.position.y <= -580) {
this.node.destroy();
}
}

Enemy.tsEnemyManager.ts这两个文件的关系是:Enemy.ts只是单纯的控制某个单一飞机的行为,比如移动位置,速度,动画,碰撞,销毁等。而EnemyManager.ts是用来管理飞机添加到场景,比如生成飞机,也包含一些可以复用的逻辑比如奖励道具

子弹发射和击中敌机的碰撞

子弹发射

子弹的如何跟随飞机同时移动?其实就是放在同一个节点下就行,这样整个都算一个容器,里面的节点自然也是相对位置

子弹也是prefab,有自己的行为,比如添加到场景中,就会自动向上移动,也就这一个行为函数

1
2
3
4
5
6
7
8
update(deltaTime: number) {
// 子弹向上移动,deltaTime是时间间隔
this.node.setPosition(this.node.position.x, this.node.position.y + this.speed * deltaTime);

if (this.node.position.y > 820) {
this.node.destroy();
}
}

这里在Player.ts里面来使用子弹,和上面Enemy.ts和EnemyManager.ts类似
在每帧都会执行的update函数中

1
2
3
4
5
6
7
8
9
10
11
12
13
14
15
16
17
18
19
20
21
22
23
24
25
26
27
28
29
30
31
32
33
34
35
36
37
38
39
40
41
42
43
44
45
46
47
48
49
50
51
52
53
54
55
56
protected update(deltaTime: number): void {

switch(this.shootType) {
case ShootType.Single: // 0
this.singleShoot(deltaTime);
break;
case ShootType.Double: // 1
this.doubleShoot(deltaTime);
break;
case ShootType.Triple: // 2
this.singleShoot(deltaTime);
this.doubleShoot(deltaTime);
break;
}
}

singleShoot(deltaTime: number): void {
// deltaTime 是时间间隔,每帧调用一次,每次时间间隔大概0.016秒
this.shootTimer += deltaTime;
// 如果shootTime大于等于frequency,则发射子弹
if (this.shootTimer >= this.frequency) {
// 播放发射子弹音效
AudioMgr.inst.playOneShot(this.shootAudio, 0.2)
// 计时器清零
this.shootTimer = 0;
// 实例化子弹
// instantiate 是 cocos 的实例化函数
const bullet1 = instantiate(this.bulletPrefab);
// 添加到场景中
this.bulletParent.addChild(bullet1);
// 设置子弹位置
bullet1.setWorldPosition(this.bulletInitPos.worldPosition);

}
}
// 双发射击
doubleShoot(deltaTime: number): void {
// deltaTime 是时间间隔,每帧调用一次,每次时间间隔大概0.016秒
this.shootTimer += deltaTime;
// 如果shootTime大于等于frequency,则发射子弹
if (this.shootTimer >= this.frequency) {
// 计时器清零
this.shootTimer = 0;
// 实例化子弹
// instantiate 是 cocos 的实例化函数
const bullet1 = instantiate(this.bulletPrefab2);
const bullet2 = instantiate(this.bulletPrefab2);
// 添加到场景中
this.bulletParent.addChild(bullet1);
this.bulletParent.addChild(bullet2);

// 设置子弹位置
bullet1.setWorldPosition(this.bulletInitPos2.worldPosition);
bullet2.setWorldPosition(this.bulletInitPos3.worldPosition);
}
}

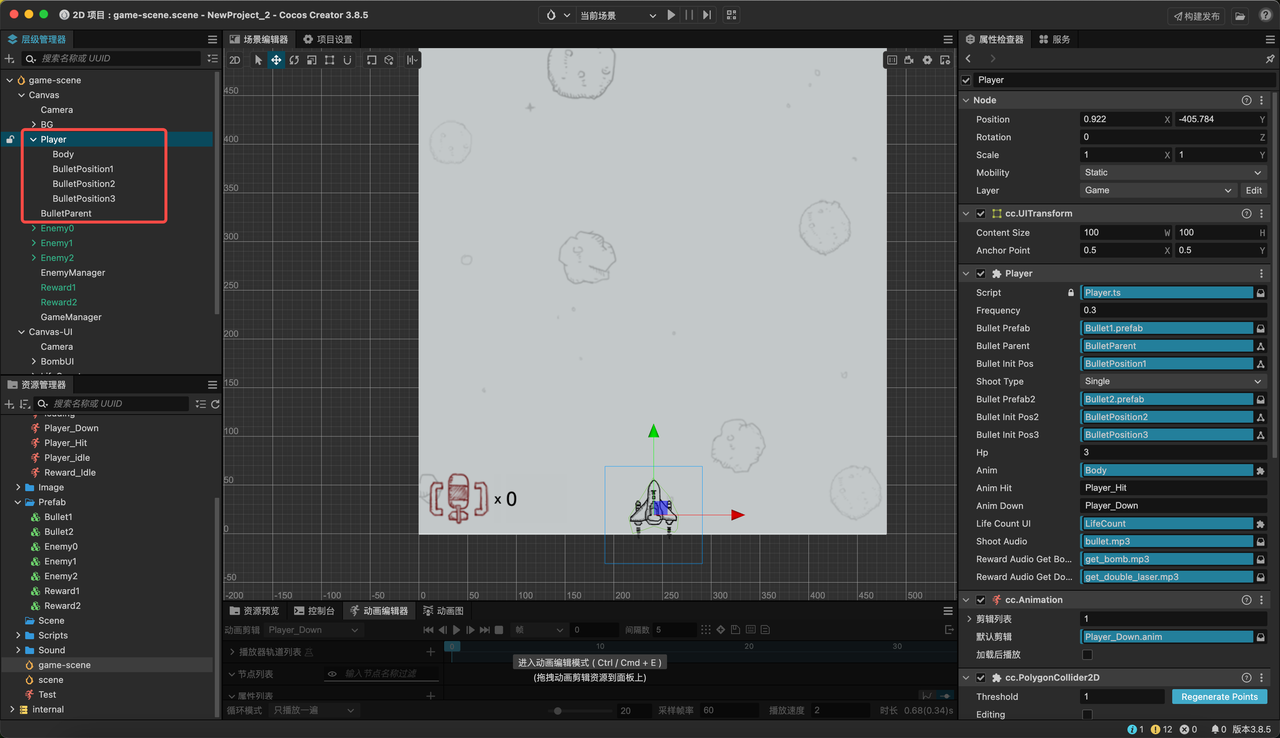
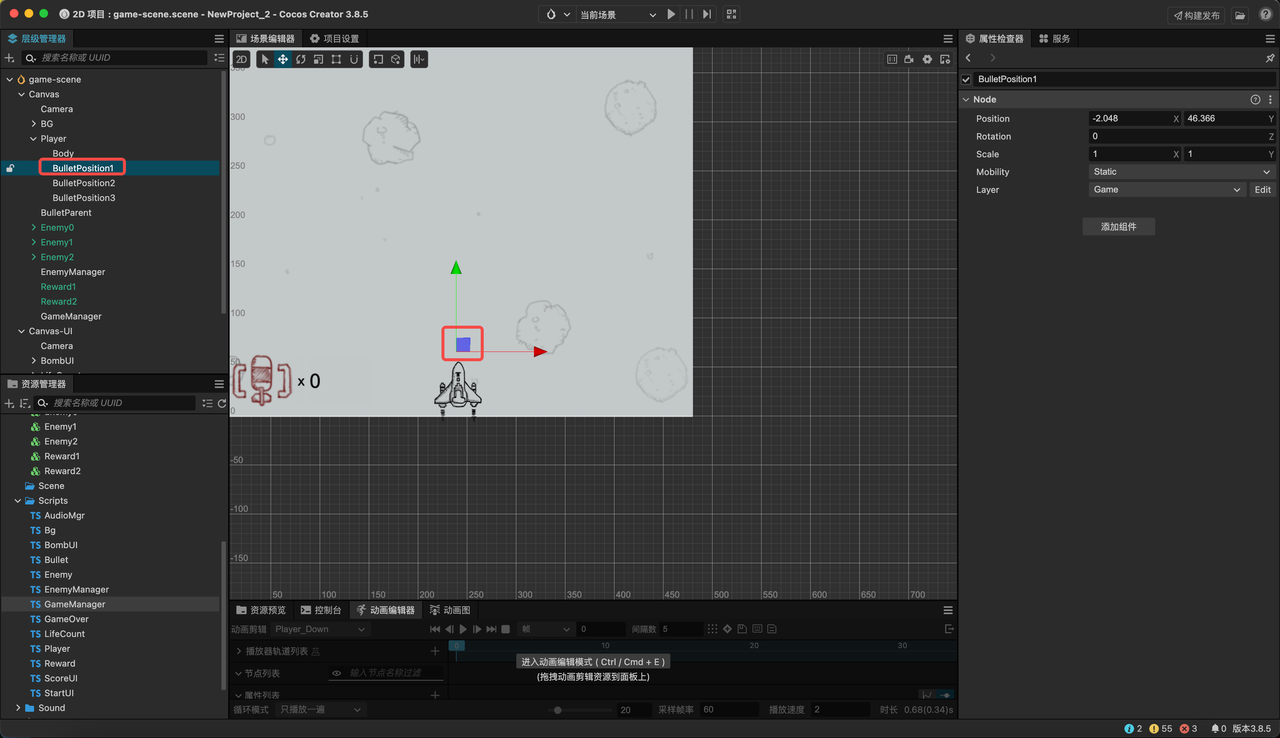
子弹初始化位置设置就是将节点放到右侧绑定,代码通过bullet1.setWorldPosition(this.bulletInitPos2.worldPosition);来实现每次初始化的坐标

子弹位置的初始化设置。当我拖动Player父节点时候,下面的节点也会跟随
敌机&子弹碰撞

碰撞部分,可以看一下cocos中的文档:刚体和碰撞组件部分
碰撞体:https://docs.cocos.com/creator/3.8/manual/zh/physics-2d/physics-2d-collider.html
刚体:https://docs.cocos.com/creator/3.8/manual/zh/physics-2d/physics-2d-rigid-body.html

用最简单的话来讲,虽然纯H5也可以实现碰撞检测,但是会比较麻烦,尤其是不规则物体,需要写很多很多的逻辑,cocos里面自带了物理模拟,比较容易实现碰撞。

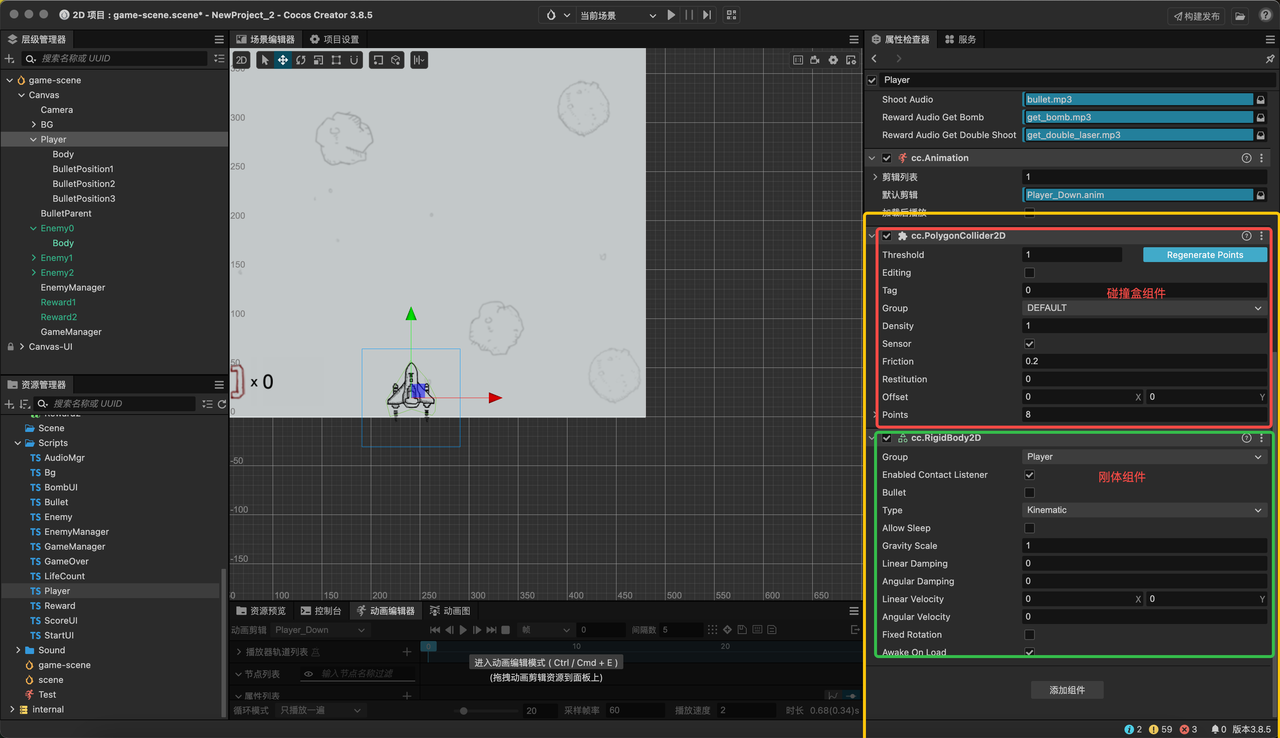
碰撞组件来定义碰撞检测的形状,刚体组件来做物理模拟和碰撞检测

实现思路:需要碰撞的组件添加刚体和碰撞组件,然后代码注册碰撞事件,完成碰撞后的逻辑,比如

  1. 子弹prefab
  2. 敌机prefab

添加碰撞组件,有盒碰撞组件(BoxCollider2D)、圆形碰撞组件(CircleCollider2D) 和 多边形碰撞组件(PolygonCollider2D)

比如玩家飞机player添加碰撞组件

代码逻辑监听碰撞

1
2
3
4
5
6
7
8
9
10
11
12
13
14
15
16
17
import {Prefab, instantiate, _decorator, Component, Node, EventTouch, Vec3, Collider2D, Contact2DType, IPhysics2DContact,Animation, Enum, game } from 'cc';

start() {
this.lifeCountUI.updateUI(this.hp)
// 注册单个碰撞体的回调函数
this.collider = this.getComponent(Collider2D);

if (this.collider) {
this.collider.on(Contact2DType.BEGIN_CONTACT, this.onBeginContact, this);
// collider.on(Contact2DType.END_CONTACT, this.onEndContact, this);
}
}

onBeginContact(selfCollider: Collider2D, otherCollider: Collider2D, contact: IPhysics2DContact | null) {
...碰撞逻辑

}

其他说明:这里再比如子弹和敌机碰撞,都添加上刚体和碰撞组件,碰撞后的逻辑写在哪里?两个文件都可以,但是建议放在敌机上,方便写销毁逻辑,不然的话还是要事件通知到销毁敌机

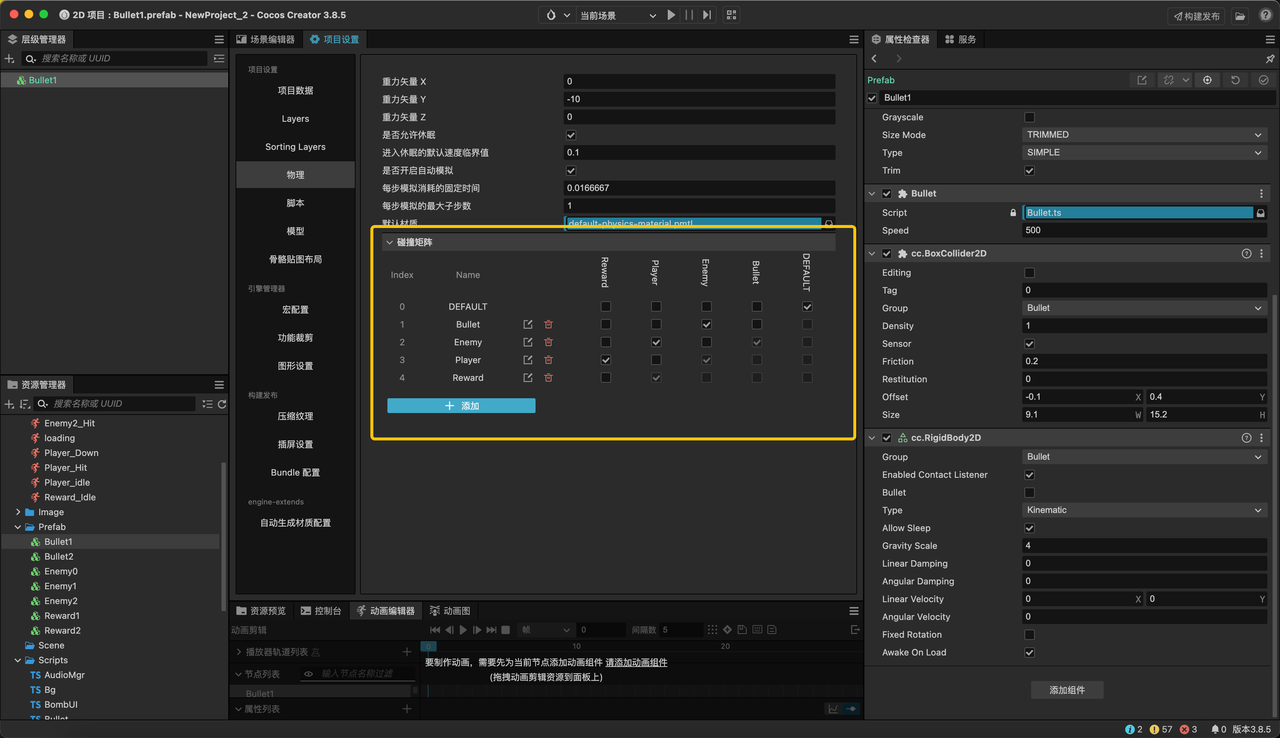
碰撞分组

需要分组知道哪些和哪些可以碰撞,比如敌机和敌机是不能碰撞的。项目-项目设置-物理

这里是一个矩阵,可以碰撞的勾选一下就行,然后在碰撞组件选择对应的分组

其他

cocos中的游戏代码组织方式

cocos中,更多的都是采用单例模式以及事件派发实现数据更新通知,可以看官网代码示例,添加音频
https://docs.cocos.com/creator/3.8/manual/zh/audio-system/audioExample.html

创建一个类,然后实例化,单例模式来调用里面的方法做通知以及更新

1
2
3
4
5
6
7
8
9
10
11
12
13
14
15
16
17
18
19
20
21
22
23
24
25
26
27
28
29
30
31
32
33
34
35
36
37
38
39
40
41
42
43
44
45
46
47
48
49
50
51
52
53
54
55
56
57
58
59
60
61
62
63
64
65
66
67
68
69
70
71
72
73
74
75
76
77
78
79
80
81
82
83
84
85
86
87
88
89
90
91
92
93
94
95
96
97
98
99
100
101
102
103
104
105
106
107
108
109
110
111
112
113
114
115
116
//AudioMgr.ts
import { Node, AudioSource, AudioClip, resources, director } from 'cc';
/**
* @en
* this is a sington class for audio play, can be easily called from anywhere in you project.
* @zh
* 这是一个用于播放音频的单件类,可以很方便地在项目的任何地方调用。
*/
export class AudioMgr {
private static _inst: AudioMgr;
public static get inst(): AudioMgr {
if (this._inst == null) {
this._inst = new AudioMgr();
}
return this._inst;
}

private _audioSource: AudioSource;
constructor() {
//@en create a node as audioMgr
//@zh 创建一个节点作为 audioMgr
let audioMgr = new Node();
audioMgr.name = '__audioMgr__';

//@en add to the scene.
//@zh 添加节点到场景
director.getScene().addChild(audioMgr);

//@en make it as a persistent node, so it won't be destroied when scene change.
//@zh 标记为常驻节点,这样场景切换的时候就不会被销毁了
director.addPersistRootNode(audioMgr);

//@en add AudioSource componrnt to play audios.
//@zh 添加 AudioSource 组件,用于播放音频。
this._audioSource = audioMgr.addComponent(AudioSource);
}

public get audioSource() {
return this._audioSource;
}

/**
* @en
* play short audio, such as strikes,explosions
* @zh
* 播放短音频,比如 打击音效,爆炸音效等
* @param sound clip or url for the audio
* @param volume
*/
playOneShot(sound: AudioClip | string, volume: number = 1.0) {
if (sound instanceof AudioClip) {
this._audioSource.playOneShot(sound, volume);
}
else {
resources.load(sound, (err, clip: AudioClip) => {
if (err) {
console.log(err);
}
else {
this._audioSource.playOneShot(clip, volume);
}
});
}
}

/**
* @en
* play long audio, such as the bg music
* @zh
* 播放长音频,比如 背景音乐
* @param sound clip or url for the sound
* @param volume
*/
play(sound: AudioClip | string, volume: number = 1.0) {
if (sound instanceof AudioClip) {
this._audioSource.stop();
this._audioSource.clip = sound;
this._audioSource.play();
this.audioSource.volume = volume;
}
else {
resources.load(sound, (err, clip: AudioClip) => {
if (err) {
console.log(err);
}
else {
this._audioSource.stop();
this._audioSource.clip = clip;
this._audioSource.play();
this.audioSource.volume = volume;
}
});
}
}

/**
* stop the audio play
*/
stop() {
this._audioSource.stop();
}

/**
* pause the audio play
*/
pause() {
this._audioSource.pause();
}

/**
* resume the audio play
*/
resume(){
this._audioSource.play();
}
}

打包发布

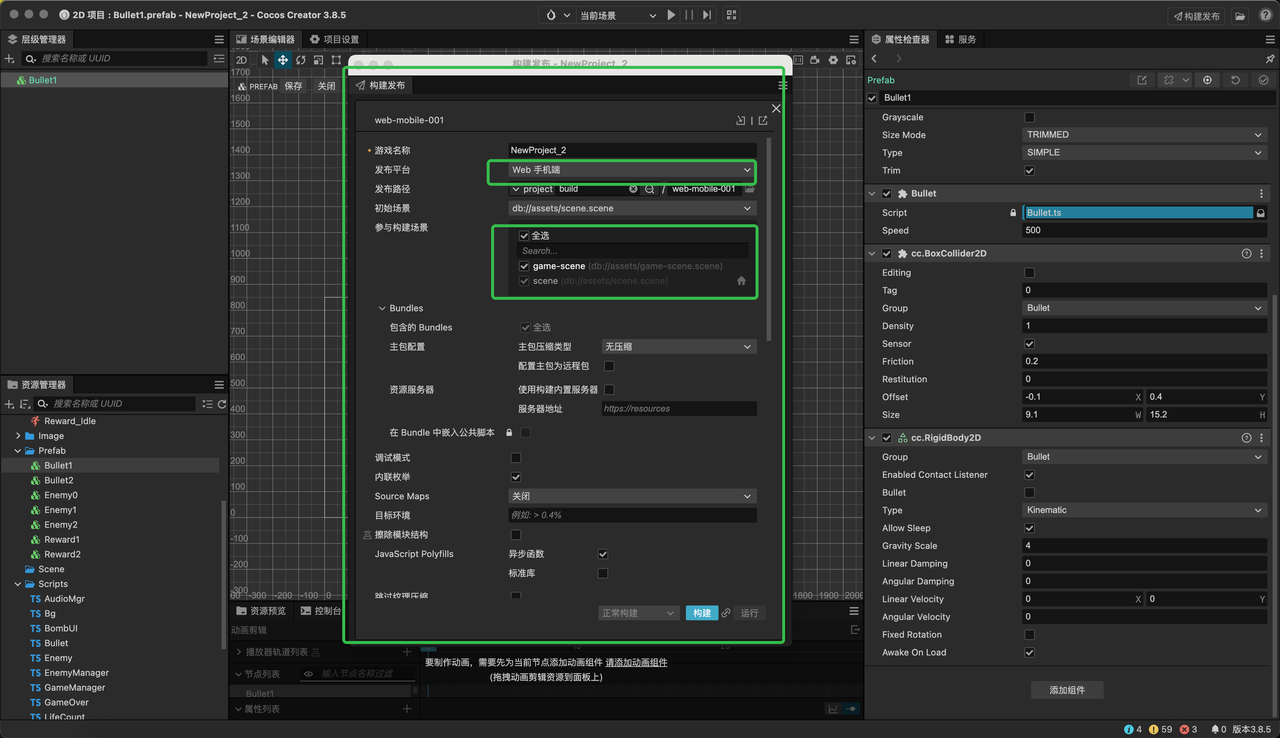
编辑器右上角-构建发布

配置项很多,我这勾选简单的几项就发布,比如需要打包的场景,发布平台等,打包后就是一个html+静态资源,可以直接部署了